
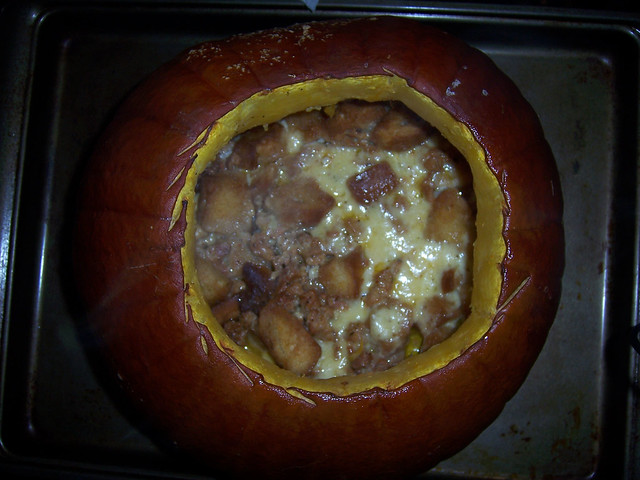
If you don't know what to do with your leftover pumpkins from Halloween - this stuffed pumpkin recipe is perfect for you. It does take almost 3 hrs (including prep and cooking time), so it's not a meal you can quickly whip up after work, but it's worth it!
A ROUGH RECIPE FOR A REALLY GOOD STUFFED PUMPKIN
Makes 2 generous or 4 genteel servings
1 pumpkin, about 2 1/2 to 3 pounds
4 ounces stale bread, sliced thin, then cut into 1/2-inch chunks
4 ounces cheese, such as Gruyere, Swiss, Blue, Cheddar or a combination, cut into 1/2-inch chunks
2-4 cloves garlic (to taste), peeled, germ removed and coarsely chopped
About 1/3 cup heavy cream
Freshly grated nutmeg
Salt and freshly ground black pepper
Center a rack in the oven and preheat the oven to 350 degrees F. Either line a baking sheet with parchment or a silicone baking mat or find a Dutch oven that's the same diameter as the pumpkin. (If you bake the pumpkin in a casserole, it will keep its shape, but it will also stick to the casserole, so you'll have to serve it from the pot, which is a rustic, appealingly homey way to serve it. If you bake it on a sheet, you can present it free-standing, if it doesn't collapse in the oven. I was lucky this time, but when I make it again tonight with a larger pumpkin, I'm not going to push my luck - I'm going to put it in a Dutch oven.)
Using a very sturdy knife, cut a cap off the top of the pumpkin. This isn't an easy job - I went around the top of the pumpkin with my knife at a 45-degree angle to get a nice size cap. Clear away any seeds and strings from the cap and hold it aside while you scoop out the seeds and filaments inside the pumpkin. (Hold onto this goop -- you can separate the seeds from the filaments and roast them.) Season the inside of the pumpkin with salt and pepper and put it on the sheet or in the casserole.
Now you have a choice, you can either toss the bread, cheese and garlic together in a bowl, then pack it into the pumpkin, or you can alternate layers of bread and cheese and scatter the garlic here and there. (I mixed everything together.) Either way, the filling should go into the pumpkin and fill it well. You might have a little too much filling or you might need to add to it -- it's hard to give exact amounts. Season the cream with salt, pepper and several gratings of fresh nutmeg and pour the cream into the pumpkin. Again, you might have too much or too little. You don't want the ingredients to swim in cream, but you do want to get a feeling that they're moistened.
Put the cap back in place and bake the pumpkin for about 2 hours -- check after 90 minutes -- or until everything inside the pumpkin is bubbly and the flesh of the pumpkin is tender enough to be pierced easily with the tip of a knife. I removed the cap during the last 20 minutes or so of baking so that the top could brown.
As you can see, I cut the pumpkin into wedges, so we could cut a cube of pumpkin and have it with some of the stuffing, but you can also leave the pumpkin whole and use a big spoon to scoop out pumpkin and filling. You could even scrape the pumpkin into the filling and mix it all up.
Caution: If you want to spoon out the pumpkin and the filling or try mixing it, you better bake the pumpkin in a casserole because you'll need to support the sides.
Playing around: I think you could play around with the filling, adding bacon or ham, herbs (a little thyme might be nice) or nuts.
**I didn't have stale bread around, so I used croutons and also added sausage that I took out of the casing and cooked first. I also used a large pumpkin so I pretty much doubled everything (and used 4 sausages). I just baked the pumpkin on a baking sheet and didn't have any problems with it falling apart.
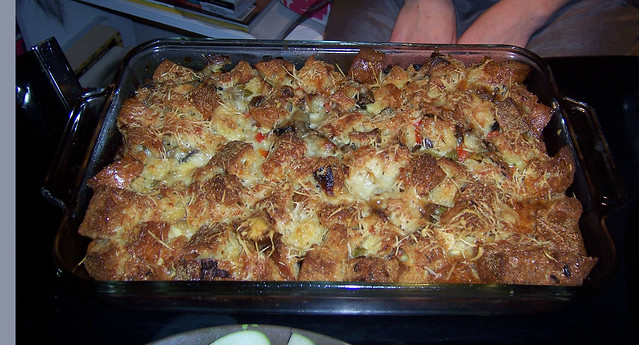
Colleen made a savory bread pudding with mushrooms and parmesan cheese that she found on Epicurious. It was so yummy - went really well with the stuffed pumpkin and the simple salad I threw together. It would make a great side dish for Thanksgiving...
Ingredients
1 (1-pound) loaf crusty country-style white bread
1/4 cup olive oil
4 teaspoons chopped fresh thyme
1 large garlic clove, minced
6 tablespoons (3/4 stick) butter
1 pound assorted fresh mushrooms (such as crimini, button, portobello, and stemmed shiitake), thinly sliced
1 1/2 cups finely chopped onion
1 1/2 cups thinly sliced celery
1 cup finely chopped green bell pepper
1/3 cup chopped fresh parsley
3 1/2 cups heavy whipping cream
8 large eggs
2 teaspoons salt
1 teaspoon freshly ground black pepper
1/3 cup finely grated Parmesan cheese
Preparation
Preheat oven to 375°F. Butter 13x9x2-inch glass baking dish. Cut bottom crust and short ends off bread and discard.
Cut remaining bread with crust into 1-inch cubes (about 10 cups loosely packed). Place cubes in very large bowl.
Melt butter in large skillet over medium-high heat. Add mushrooms, onion, celery, and bell pepper. sauté until soft and juices have evaporated, about 15 minutes. Add sautéed vegetables and parsley to bread cubes.
Whisk heavy cream, eggs, salt, and ground pepper in large bowl. Mix custard into bread and vegetables. Transfer stuffing to prepared dish. Sprinkle cheese over. DO AHEAD Can be prepared 1 day ahead. Cover and refrigerate.
Preheat oven to 350°F. Bake stuffing uncovered until set and top is golden, about 1 hour. Let stand 15 minutes.
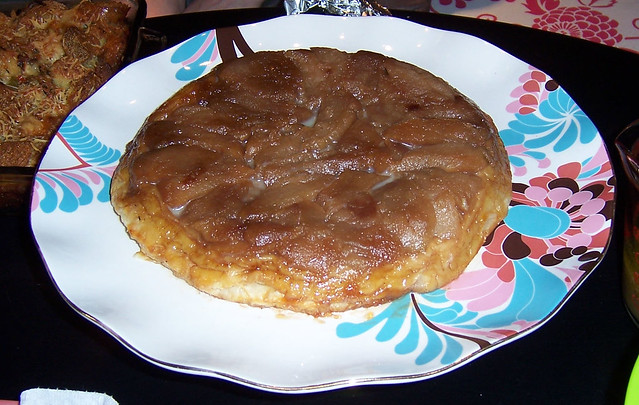
For dessert, Karen made a delicious tarte tatin - she got the recipe from Smitten Kitchen. Instead of making the crust, she used store bought puff pastry that is a bit pricey but worth it (I think she got the puff pastry from Whole Foods). The only other thing she added was a dash of vanilla when melting the butter. And we ate it with some dulce de leche ice cream...yummmmm. I wish I hadn't eaten all of the leftovers yesterday!!
Molly’s Apple Tarte TatinAdapted from The Joy of Cooking
Crust1 stick plus two tablespoons cold salted butter (5 ounces), cut into cubes and chilled in freezer1 tablespoon sugar (optional)1 1/2 cup flour3 to 6 tablespoons ice water
Filling7 medium apples (I’ve had good results with Granny Smith, Gala, McIntosh…use your favorite, but make sure they are very firm, fresh and flavorful.)1 stick (4 ounces) salted butter1 cup sugar
Prepare Crust: I always use the food processor for this. Pre-mix the flour and sugar in the food processor container, and cube the butter on a plate. Then put the dry ingredients and the butter in the freezer for a while. This will get everything, including the blade and container, nice and chilled. The colder everything is, the flakier and more tender your crust will be. Prepare about 1/3 cup ice water and refrigerate.
After you’ve chilled everything for at least 20 minutes, add the cubes of butter to dry ingredients and pulse until the largest pieces of butter are no bigger than tiny peas.
Add the ice water a little at a time, processing just until the dough starts to come together into a mass. (it won’t quite be a “ball,” and it won‘t look smooth–you don’t want to overprocess it!) Turn out onto well-floured surface and pat together into a ball. Don’t handle the dough too much, or the warmth of your hands will start to melt the butter. Flour the top of the dough and use rolling pin to quickly press and roll the dough out into a 10 to 11-inch circle. Keep turning the dough as you do this to make sure it doesn’t stick to the rolling surface. Throw more flour underneath the dough if necessary. Check the crust to make sure it’s just big enough to cover the top of your tarte tatin pan. Move the crust onto a piece of parchment paper or onto a floured rimless baking sheet, cover with plastic wrap and refrigerate.
Prepare filling: Preheat oven to 375° F
Peel, core and quarter the apples. Don’t cut them into smaller pieces than quarters–the quarters shrink considerably during cooking. You can squeeze a bit of lemon on them, but it’s not necessary.
Over low heat in a heavy, ovenproof skillet measuring 7 to 8 inches across the bottom and 10 to 11 inches across the top, melt the stick of butter. Remove from heat, add the sugar and stir until blended.
Shake/tap the pan so the butter-sugar mixture distributes evenly across the bottom. Arrange apple quarters in pan, first making a circle inside the edge of the pan. Place them on their sides and overlap them so you can fit as many as possible. Then fill the center of the pan; you may have some apple left over. Keep at least one extra apple quarter on hand–when you turn the apples over, they may have shrunk to the extent that you’ll need to cheat and fill in the space with an extra piece. This one piece won’t get quite as caramelized as the other pieces, but don’t worry–it will still cook through and no one will notice.
Return your pan to the stovetop on high heat. Let boil for 10 to 12 minutes or until the juices in the pan turn from golden in color to dark amber. Remove from heat. With the tip of a sharp knife, turn apple slices over, keeping them in their original places. If necessary, add an extra slice of apple to keep your arrangement intact. Return to the stovetop on high heat once more. Let cook another 5 minutes and then remove from heat.
Place the crust on top of the apples and brush off excess flour. Tuck edges under slightly, along the inside of the pan, being careful not to burn fingers. You can use your knife.
Bake in oven until the top of the crust is golden-brown in color, about 25-35 minutes. Remove from oven and allow to cool on a rack about 30 minutes.
Run a sharp knife along the inside edge of the pan. Place a plate or other serving dish on top of the pan and quickly flip over the whole shebang so the Tarte Tatin drops down onto the plate. The pan will still be hot, so use potholders and be careful! Don’t burn yourself or drop stuff! If you are feeble and clumsy, get someone stronger and more coordinated than you to do this. Peek under the edge of the pan to see if the Tarte came out. You may need to bop the bottom of the pan with your potholder-encased fist for this to happen. If there are any pieces of apple left behind in the pan or otherwise out of place, carefully put them back where they are supposed to be. Voila! A beautiful TREAT!
This keeps well for about a day at room temperature; if you have to refrigerate it, warm it up slightly before serving for optimum enjoyment.
No comments:
Post a Comment